Ezy Mechanic

Ezy Mechanic | Machine components and linkages design made easy.

Saturday, August 8, 2015

Grashof's Criterion: Crank-Rocker Four-Bar Mechanism

with 0 Comment
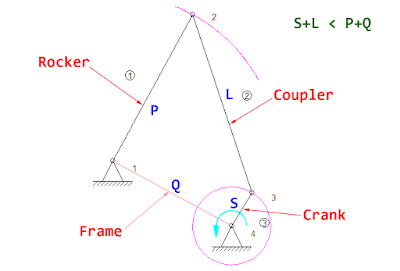
Grashof's criterion for Double Crank Four-Bar Mechanism is almost the same as Crank-Rocker Mechanism. They're both defined as S+L < P+Q. The difference is on the location of the shortest link (S). For double crank mechanism, S must be on the ground link (frame). But for the crank-rocker, S will be on the side link and it must be the input link.

We then move the shortest link from the frame to the side link on LH. With the help of SAM 7.0 Professional software (by Artas Engineering), it can display the paths of desired nodes as shown in the picture.
Crank-Rocker linkage with SAM 7.0 The Ultimate Mechanism Designer
Grashof's Criterion: Crank-Rocker Mechanism using SAM 7.0 Professional Software
The pink curves represent paths of desired nodes. The input link which is now the shortest link is able to make a full revolution. It's called a crank. And the output (can be either L, P or Q) will only oscillate around its pivoting point. It's called a rocker. But if we change the driver to node 4 and let it drives from the link which is not the shortest link, it can't be reversed. The shortest link can't make a full revolution. What we have to do is to swap as shown in the following picture and it becomes a crank-rocker mechanism again which is now driving from the RH pivoting point.
Grashof's criterion: RH driver with SAM Mechanism Design Software
Grashof's Criterion: Crank-Rocker Mechanism Driver on RH side
How can we see the velocity? From the path display, we can see how they move. But to see the velocity, we can choose to display the hodograph.
Path is the line that a moving point describes in the fixed reference system.
Velocity Hodograph is the locus of the arrowhead of the velocity vectors (rotated 90 degree) of a moving point. 
 The hodograph in SAM 7.0 is shown as follows.
Velocity Hodograph in SAM 7.0 The Ultimate Mechanism Designer
The lines on the outside of the path represent CCW direction of the node. And the lines at the inside of the path represent CW direction of the node. From the above picture, we can see that the input link of the crank-rocker mechanism rotates at a constant speed in CCW direction since the hodograph displays uniform lines at outside of the circular path. However, the output link oscillates back and forth with changes in velocity since there are lines of the hodograph both on the outside and inside of the its curve path. And we can quickly point out the position where the mechanism has highest velocity from longest line on the hodograph. SAM 7.0 is also able to plot various design parameters of the mechanism e.g. velocity, displacement, acceleration, length, etc. In the above picture, LH graph shows the velocity profile of the output link which can be traced manually. The following shows the hodograph of the double crank mechanism for a comparison.
Hodograph of Double Crank Mechanism
The following is the video showing how to use SAM 7.0 Software to simulate the double crank and crank-rocker mechanisms.

Wednesday, August 5, 2015

Grashof's Criterion: Four-bar Mechanism Double Crank

with 0 Comment
One of the most commonly used linkages is the four-bar linkage. It consists of 3 moving links and 1 ground link (also called a frame). There are 4 pin joints connected between those links. And from Gruebler's Equation, it's the mechanism with 1 degree of freedom (1DOF) which requires only 1 actuator to drive and control position of all linkages. The four-bar mechanism consists of the following components.
4-bar linkages components
Four-bar mechanism components
The link that connects to the driver or power source is called the input link. The other link connected to the fixed pivot is called the output link. The remaining moving link connected between input and output links is called the coupler. It couples the motion of the input link to the output link.

There are different configurations of lengths of the four-bar mechanism and it results in different movements of the mechanism. Grashof's Criterion helps classifies into the following categories:
  1. Double Crank --- also called a drag link mechanism
  2. Crank-Rocker
  3. Double Rocker
  4. Change Point
  5. Triple Rocker
In this post, we're going to explore the case of Double Crank which both input and output links are able to rotate through a full revolution. We use Autodesk ForceEffect app on Google chrome to illustrate and demonstrate how the mechanism moves. The links can be setup easily by just dragging. The exact length dimension can also be specified. Once we setup all required items i.e. links, pivots and drive, we can play and see the animation of the linkages with the path of desired tracing points.
Autodesk FORCEEFFECT for Mechanism Design
Autodesk ForceEffect app on Google chrome
Grashof's criterion states that a four-bar mechanism has at least one revolving link if:

S + L ≤ P + Q

where:
S = length of the shortest link
L = length of the longest link
P = length of one of the intermediate length links
Q = length of the other intermediate length link

For the Double Crank category, the following criteria must be satisfied:

Double Crank:

  • S + L < P + Q
  • S is the length of the frame (ground link)
So we setup the links in ForceEffect app as follows.
Grashof's criteria for double crank four-bar linkage
Grashof's Criteria for Double Crank 4-bar Mechanism
The shortest link (S) is the frame which is 400 mm long. The length of the longest link (L) is 1300 mm. The remaining 2 intermediate links (P and Q) have length 700 mm and 1200 mm.

This satisfies Grashof's criteria since (S)400 + (L)1300 < (P)700 + (Q)1200. And this is how this mechanism moves.
Path and velocity vectors of double crank 4-bar mechanism
Paths of double crank four-bar mechanism
Both input and output links can make a full revolution as desired. Let's find more details of other categories in later post.

The following video shows how to use ForceEffect app to simulate the motion of double crank four-bar linkage.

Reference:

Wednesday, July 29, 2015

Gruebler's Equation for calculating Degrees of Freedom of the Mechanism

with 0 Comment
Animated 1DOF Linkage
Mechanism with 1 degree of freedom
To design the mechanism, the first thing we should check is the number of degrees of freedom (DOF) of the mechanism. The degree of freedom is the number of inputs required to control the position of all links of the mechanism. It's usually the number of actuators needed to operate the mechanism. 

We can use Gruebler's equation to calculate the number of degrees of freedom of the mechanism as follows.

Gruebler's equation for calculation number of degrees of freedom
Gruebler's Equation
where:
F = number of degrees of freedom
n = total number of links in the mechanism
L = total number of lower pairs (1 DOF such as pins and sliding joints)
H = total number of higher pairs (2 DOF such as cam and gear joints)

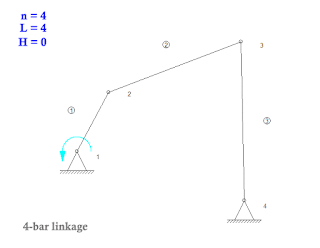
4-bar linkage: Gruebler's equation
4-bar linkage
In the machine, we often require one degree of freedom which we can position all linkages with only 1 actuator. The four-bar linkage as shown in the picture is the example of the mechanism with 1 DOF. It has 4 links (3 bars with 1 ground link) and 4 revolute joints which the degree of freedom (F) can be calculated as follows.
  • n = 4 --- 4 links
  • L = 4 --- 4 revoulte joints
  • H = 0 --- no higher pairs
  • F = 3(4-1) - 2(4) - 0 = 1
Another example of 1 DOF mechanism is the slider-crank mechanism where it has the following number of links and joints.
Gruebler's count of Slider-Crank Mechanism
Slider-Crank Mechanism
  • n = 4 --- 2 links + 1 ground link + 1 slider
  • L = 4 --- 3 pins + 1 slider
  • H = 0 --- no higher pairs
  • F = 3(4-1) - 2(4) - 0 = 1
The gears mechanism also has 1 DOF since it has the following values.
Gears Mechanism: Gruebler's count
Gears Mechanism
  • n = 3 --- 2 gears + 1 ground link
  • L = 2 --- 2 revolute joints
  • H = 1 --- 1 gear joint
  • F = 3(3-1) - 2(2) - 1 = 1
These 3 examples have 1 degree of freedom which requires only 1 actuator to move the mechanism. It could be a motor, an air cylinder, etc.

If we change the slider joint of the slider-crank mechanism to the fixed pin joint, the mechanism will be locked since it has 0 DOF which is considered as a structure. The calculation using Gruebler's equation is as follows.
0 DOF is a structure, frame
Structure: Degree of freedom = 0
  • n = 3 --- 2 links + 1 ground link
  • L = 3 --- 3 pin joints
  • H = 0 --- no cam or gear joints
  • F = 3(3-1) - 2(3) - 0 = 0  --- F=0 then it can't move.
If one of the pin joint of the 4-bar linkage changes to the slider joint, it will increase both the number of links and number of lower pairs. This makes the mechanism unconstrained because it has 2 DOF and required 2 actuators to control the position of the mechanism.
  • n = 5 --- 3 links + 1 slider + 1 ground link
  • L = 5 --- 4 pin joints + 1 slider joint
  • H = 0 --- no higher pairs
  • F = 3(5-1) - 2(5) - 0 = 2 --- F > 1, the mechanism is unconstrained.
References:

Stiffness of a lever with eccentric loading - Part 2

with 0 Comment
Let's continue from the previous post. We clearly see that the small post must be shortened because it the weakest point and creates torsional load to the lever arm. We're going to try redesigning with a bent lever arm so that the loading point stays in the middle of the center line of the arm.
bent lever's end to reduce torsion
Lever bending to eliminate torsion
The eccentric distance "r2" is shorter than previous design (r1). It's now the eccentric dimension with respect to the bent portion of the lever. Torsion still exists at end portion which has shorter length. This gives much less torsion compared with the earlier design. It also eliminate the torsion from the longer part of the lever since the loading point stays at the center line of the lever.
torsion elimination of the lever
Two lever designs at the same loading point
From the overlay, we can see that the pull rod connecting point is still at the same location. The lever arm still connect to the same hub. But we can reduce the length of the small post which is the pin for the pull rod connection. The longer portion of the lever is now under bending only. Most torsion has been eliminated. It exists at the small portion as explained.
FEA displacement of improved lever
Finite element analysis - displacement of the lever with bent end
Shortening the small post and keeping the loading point on the center line of the lever can reduce displacement from 2.4 mm to 1.6 mm (33% reduction). Small twisting is present at the end but there is no twisting over the long portion of the lever.
FEA von Mises stress of bent beam
von Mises stress of the bent lever
The von Mises stress reduces about 77%. This improvement can be used in most cases even when the lever shaft is short and the pull rod location is beyond the lever hub location and it's stiffer than the big lever with small post. The following picture is the example of bent levers on the machine.
example bent lever on machine
Example of a bent lever on the machine

Tuesday, July 28, 2015

Stiffness of a lever with eccentric loading - Part 1

with 0 Comment
A lever is a mechanical part that has arms and a fixed pivot used to transmit torque. The cross section of the arm is usually a rectangular shape which makes it stiff against bending. However, its stiffness may become lower if the loading point is not on the right place. We're going to see the effect of torsion on the lever with the improvement idea.

The following picture is the components of a general cam and lever system. The lever has the hub in the middle. It's where bearings are placed inside and it's the fixed pivoting point on a lever shaft (not shown). There are 2 arms to the left and the right. They're both welded to the hub and rotate together. The right arm is connected to a cam follower that rolls over cam surface. When the cam rotates the lever will swing up and down since there will be spring forces pushing the cam follower to keep contact with the cam surface all the time. The left arm has another point to connect to other machine parts, which usually is a pull rod. It will rotate at the same angle (degrees) with the right arm, but the distance (mm) may be different depending on a lever ratio.
Lever components with cam
Components of cam & lever system
The pull rod connecting point on the left in this example is not good since it has a long distance from the arm and the arm will not only be subjected to bending but also torsion. The following is the lever in the machine.
Lever with eccentric pull rod connecting point
The eccentric distance "r" usually comes from space limitation on the lever shaft. There may be some other machine parts blocking the lever and it can't move any further. The hub stays at the same location and the lever is just straight from the hub. Because of this, there will be a gap between the lever and the pull rod. That's why the designer add that small connection post at the end.
Lever arm twisting from eccentric load
Load from the pull rod
The small post will be subjected to bending and the lever arm will also subjected to bending as well as torsion. If the distance "r1" is much less then it could improve the stiffness. Here is the finite element analysis result of this lever.
FEA displacement of eccentrically loaded lever
Finite element analysis - displacement of the lever under eccentric load
We can see from the finite element analysis result that the lever bends down due to the load and it also twists to the right because of the eccentric load. However, the small post that connects to the pull rod reduces the overall stiffness since it also bends down.
FEA von Mises stress of lever with eccentric load
von Mises stress of the lever under torsional load
The highest von Mises stress is at the weakest point on the small post as shown in the picture.

To reduce the overall displacement, the overall stiffness will improve. We can change some designs to eliminate the torsion away from the lever arm and reduce the length of the post. Let's see how it's done in the next post.

Monday, July 27, 2015

Stiffness of a welded straight square tube

with 0 Comment
To modify or improve process of the existing machine in a production line may have some constraints regarding available spaces. There may be other moving objects or fixed parts which obstruct mounting of newly design parts. The part that comes later may be more complex since it has a limited space for mounting. The green support, design C from earlier post, is the example.
complex shape of welded part to avoid interference with existing object
Part with other object occupied spaces
This is the side view of the above picture. The moving object occupies the space above the horizontal square tube and the design is in the L shape as shown below in order to avoid interference.
Projected view of support design C
Side view of design C
This green support takes both loads in x and z directions. The load in z will try to bend the part and the load in x will try to twist the part. The dimension L is quite long from the center of the horizontal tube and the torque which is product of Fx and L will easily twist the horizontal tube. Since L is long, only a few twisting degrees of the tube will result in having larger displacement at the end (at the top flange where the loads applied).
Loads that bend and twist the square tube
Loads on welded part (design C)
If there is no obstruction above the horizontal tube, we can then change the design not to form the L shape in order to avoid twisting of the tube as shown below.
New design with no torque on the tube
Straight tube design when space is available
The force in z is still trying to bend the straight tube up. However, the force in x will not try to twist the tube anymore. It's trying to bend the tube to the left instead. And with this design we can reduce the mass from 0.92 kg of design C to 0.71 kg which is about 23% reduction. And here is the finite element analysis result using the same fixations and loads.

FEA result: displacement of straight tube design
Finite element analysis result: displacement of straight tube design
Not only mass reduction, but also the stiffness increases. The displacement reduces from 9.7 mm of design C to 6.98 mm which is about 28% reduction. This is because we eliminate the torque from the tube. But of course, this is when there is available spaces above the horizontal tube of design C.

We will apply this torque reduction design to other applications in later posts. Please stay tuned!

Saturday, July 25, 2015

Stiffness comparison of welded parts - Part 4

with 0 Comment
As we can see from previous post that design C is still the best choice since it's light-weight and relatively rigid compared to other designs. Design E is the most stiff design but it's also the most heavy design. Let's continue with the remaining 2 designs with 4 ribs at the mounting base to see whether they're better than design C or not.

FEA result: displacement of welded parts with 4 ribs at the base
Finite Element Analysis result: Displacement of Design G
The weight of this design is in the same level as design D, but it's more rigid. When compared to design A, its weight is 123% and the displacement is 72.8%. Then we increase lengths of those 4 ribs in order to reduce the displacement. This is design H which its mass increases to 133% of design A. Here is the FEA result.

FEA result: displacement of welded tubes with longer ribs at base
Finite Element Analysis result: Displacement of Design H
The displacement is 9.72 mm which is 65.8% of design A. It's comparable to design C, but heavier. So design C is still the best choice. It's simple, not difficult to make, light-weight and stiff. The following is the summary of displacement and mass of all designs. The value in percentages are compared to design A.

Summary of displacement and mass of different designs
Summary of displacement and mass of different welding designs
 The red, yellow and green are used to express what is desirable and what isn't. Red is undesirable and green is desirable.

We hope the experiment about the stiffness using finite element analysis in these 4 posts may provide you the idea of improvement. Sometimes, we add extra materials (more weight, more cost) but gain very little. Sometimes, only minor changes change significantly improve the design with acceptable weight and cost.

The following is the video showing more details of this experiment.


Design C is good when we can't have any parts above the horizontal tube. It may interfere with other parts, for instance. However, if there is no space limitation above the horizontal tube, we could greatly improve the stiffness of the structure and reduce the weight. Let's find out in the next post.

Total Pageviews

SEO Stats powered by MyPagerank.Net

Disclaimer

Every care has been taken to ensure the accuracy of the information but no liability can be accepted for any loss or damage whether direct, indirect or consequential arising out of the use of the information or calculation sheets from our blog.
Powered By Blogger